Learning Center
writing
Deliver 10 pictorial writing lessons with sentence-building benefits
april 9, 2024
Teach young writers how to draw with details. While students are learning language foundations and concepts of print within guided writing exercises, deliver a second daily writing lesson that teaches them how to express and develop their own ideas, opinions, and stories via pictures.
These lessons not only teach students how to communicate with readers before they can write words, but these are also the same types of details that will later enhance their sentence writing.
Here are 10 ways early writers can add pictorial details.
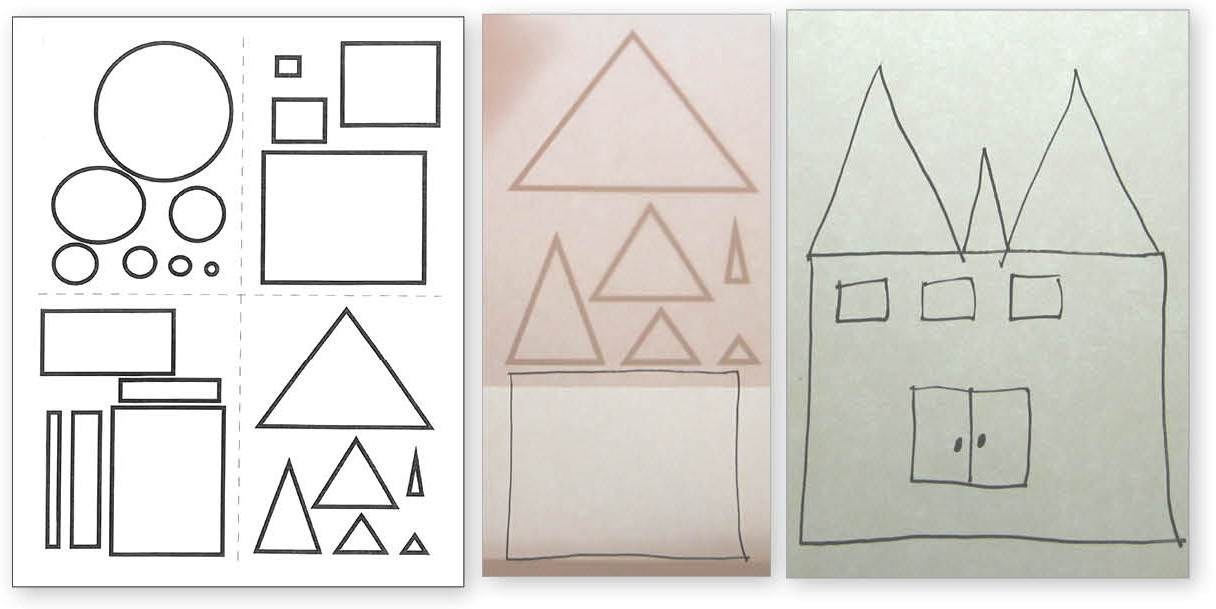
#1 Layer shapes
Encourage young writers that they can draw any topic by seeing it as several layered shapes (e.g., a school bus is a rectangle with four circles for the wheels). Knowing how to break down objects into small, layered shapes broadens the pool of topics that students feel equipped to write about.
Model how the writer should draw the biggest shape(s) first. Every topic gets “built” by layering the medium and small shapes on top of the biggest shape(s).

#2 Introduce color
Emphasize that coloring isn’t just an activity; it’s a tool to communicate. Before students write color words within labels and sentences, they can tell the reader the type of ball (orange = basketball, black and white = soccer ball, etc.) that they are playing with or the flavor of ice cream (brown= chocolate, pink= strawberry, green=mint, etc.) that they are enjoying. Adding color details is one way to tell the reader more information within a picture.
#3 Color accurately
Although color can add details, using unrealistic colors confuses the reader. A blue banana or green sky might seem fun, but they send the wrong message. Readers might not recognize an apple if the circular object is colored blue.
Teach students how to choose true-to-life colors to depict objects accurately. When the color closely matches what the object looks like in real life (e.g., green grass, blue sky, yellow sun) then the message is more clear and information more accurate for the reader. This lesson is relevant far beyond the pictorial writing stage as writers tell truthful details within all forms of informative writing.

#4 Depict people
Writing topics don’t just include events, concepts, and activities—people are a common topic, too. This may include real people (e.g., family members, community helpers, school friends, etc.) or even characters from reading. In order to communicate who we are writing about, we have to learn how to draw people. Teach students how to depict an individual by drawing and layering the same basic shapes.
- Head = circle
- Neck = small square
- Torso = long rectangle
- Arms = skinny rectangles
- Legs = skinny rectangles
Teach students to start at the top of the body and work down, drawing the head and torso, then the arms, and finally the legs.
These first four skills help students to convey the general subject of their writing—but don’t stop there. Continue instruction on how to develop a topic further by including additional information within their pictorial writing.

#5 Magnify details
Explain that writers look at the world closely—like through a magnifying glass. They study things to see the tiniest details to include within their writing in order to give the reader more precise information about the story or topic. Show details in picture book illustrations to help children see how close-up details add to the text.
Discuss different types of close-up details and how students could draw them.
- Add close-up details: veins on a leaf, ladybug on a branch, windows on a bus, links on a chain, polish on fingernails, buttons on a shirt, etc.
- Add texture to objects: rough bark on a tree, bumpy salt on a pretzel, soft fur on an animal, spiky grass on the ground, etc.
- Add details to people: hair (e.g., length, color, style, etc.) and accessories (eyeglasses, earrings, cane, etc.).
- Add clothes to tell if it’s a boy or girl, adult or kid. Include clothing details to indicate where the individual might be going (e.g., pajamas, uniform, raincoat, etc.).
Encouraging students to think of the small details when they are drawing pictures will likely translate into them inserting interesting details within their sentences later.
#6 Convey feelings
Writers don’t just share who the writing is about; they also show how the individual feels. Review picture book illustrations where the character is happy, sad, mad, scared, etc. Explain that the illustrator changed certain details in the faces of their subjects to convey different emotions.
Teach young writers how to add feeling by adjusting the shape of the eyes, eyebrows, and mouths. Considering these details early sets the foundation for students to value the trait of voice in the future.

#7 Reveal action
Study the characters depicted within the illustrations of recently read picture books (e.g., characters sitting on the bus, jumping rope, eating, etc.). Emphasize that people/characters don’t just stand still with their arms to their sides—they are doing something. They walk, run, throw, catch, wave, jump, cheer, etc.
The individuals that students write about likely have jobs, are active, and do important things. This requires instruction on how to draw individuals in different poses by using bent or L-shaped legs and/or arms. Including these pictorial details adds action to the information and encourages the labeling of verbs in the future.
#8 Capture speech
Acknowledge that individuals don’t just do things, they say things as well. This includes characters in stories, famous people in historical events, and individuals in everyday situations.
Therefore, students need to know how to add speech bubbles near people/characters who are drawn with their mouths open. Even though the bubble may be blank, it reveals that the young writer is beginning to grasp the concepts of dialogue and/or expert quotes.
#9 Provide setting
Teach students to put their characters in a setting, environment, or habitat to give the reader more information. The addition of setting details around the main topic communicates when and where something is happening. Such setting details may be added in front of, behind, or next to the main subject.
- Add a physical place: Grandma’s house, apartment buildings, grocery stores, fast food restaurants, school, etc.
- Add relevant props or objects common to a specific indoor location: wheeled carts at the grocery store, tables and chairs at a restaurant, etc.
- Add details to outdoor settings: signs of the season (e.g., trees with no leaves), color to show weather (e.g., bright yellow sun, blue rain drops), time of day (e.g., a background that is blue or yellow for daytime, black for nighttime).

#10 Size proportionately
Setting details must be sized and proportioned accurately. Items that are larger should be drawn larger. Items that are smaller should be drawn smaller. This will help the reader better understand the writer’s ideas. If a character in a picture is taller than the house, the reader might wonder if the house is a doll house. Help students learn to draw proportionately to convey accurate meaning.
Although these 10 lessons improve pictorial writing, they have a long-term benefit, too. When students receive early instruction on how to develop their ideas in pictures, they can apply those same skills to developing ideas into sentences.
Just as young readers are learning to decode and comprehend, young writers need direct instruction on both language foundations and language composition. We don’t need to wait until they are writing sentences to begin teaching students how to develop persuasive, informative, and narrative topics. This can be taught at the pictorial-writing stage.


Overcome “listy” writing with idea development

[writing]
Access free download for 20 Ways to Develop an Idea

[writing]