
Learning Center
writing
Adjust letter-writing skills to write effective emails
april 18, 2023
Teach students how to communicate clearly and concisely within electronic genres. Provide explicit instruction on the purpose, content, and structure of email correspondence. Then expect students to apply these steps in all future student-to-teacher emails.
Step 1: Use the right email account
It may seem obvious, but tell your students that all email communication should come from their school email accounts. Let them know that you get dozens of emails every day, many of which land in the spam folder. But when a school email address appears in your inbox, you immediately recognize the name and its importance.
Step 2: Use the subject line wisely
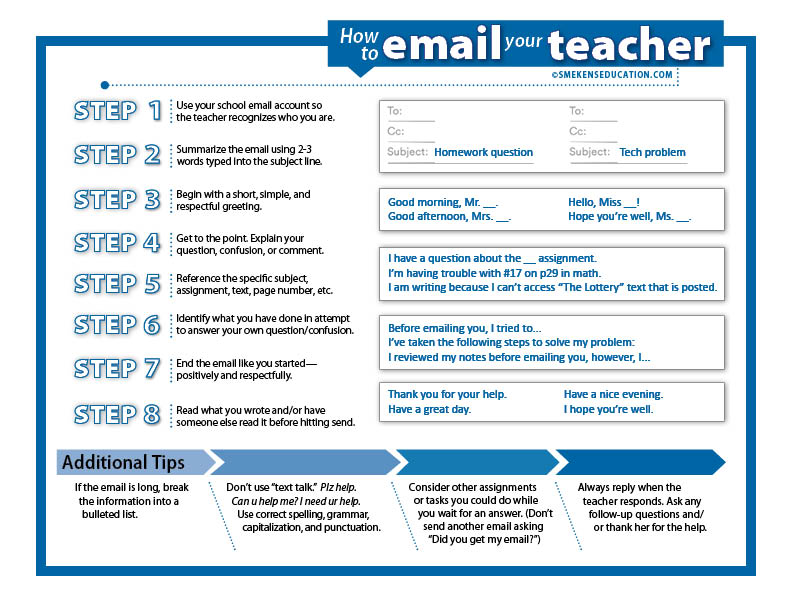 There is so much value to a well-written subject line. This is a unique component to emails that most other letter-writing genres do not utilize. The goal is to use just a few words to clearly articulate the topic and purpose of the email.
- Following up on absence
- Literary analysis paper
- Question about math prob. #2
- Tech issue
When it comes to writing the subject line, don’t be clever or vague; just get to the point!
Step 3: Start with a proper greeting
Even though an email to the teacher is not necessarily a friendly letter, we can still set the expectation that students begin each email with an appropriate greeting. After all, just like when interacting in person, there should be some level of formality involved when a child communicates with his or her teacher.
- Good morning, Mrs. Jackson.
- Hello, Mr. Piner. I hope you’re having a great day!
- Dear Miss Jones,
Addressing the criteria for a respectful greeting will set the tone for a positive two-way conversation.
Step 4: Get to the point
Because an email is NOT a friendly letter, teach students that it’s okay to jump right to the main point. Identify your question. Describe your confusion. Reveal your problem. Email recipients expect electronic communication to be focused and short.
Step 5: Be specific
While we want students to use words sparingly when they write emails, we also want them to provide very specific details about their comment or question.
- DON’T WRITE: I need help with science.
- DO WRITE: I am confused about what is due for the science assignment posted for Tuesday.
- DON’T WRITE: I don’t get it.
- DO WRITE: I need help with problem 12 on page 43.
In order to help students understand what is meant by specific details, consider using questions like these to illustrate the point.
- What subject or class period are you referring to?
- What homework assignment are you referring to?
- What aspect of the assignment don’t you understand?
- Is there a specific page number or problem number that you are struggling with?
- What specifically do you need to be successful on this assignment?
The goal is for students to write short, concise emails that contain specific information about the support they need.
Step 6: Demonstrate initiative
If students seek help, expect them to first attempt to solve their own problems. Require that they list all the things they did to try to answer their own questions.
- Before emailing you, I reviewed my notes and rewatched the video.
- Even after reviewing the instructions, I’m still confused about…
- I asked a couple of classmates before sending this email, but I still have some questions.
Step 7: End with a proper sign-off
Just as the beginning of the email should have a proper and respectful greeting, we want students to end every email with a similar approach.
- Thanks for your help.
- Have a great day.
- I appreciate your support.
- See you tomorrow.
These simple lines followed by the student’s name/email signature provide the closure that every email needs.
Step 8: Review and edit
Finally, before students hit the “send” button, it’s important to have them review what they have written. Remind students that when they send an email, it’s the same as publishing their work. Just as they wouldn’t want to publish their work for the general public without reviewing and editing it first, the same is true with an email.
- Does it make sense?
- Did you spell all the words correctly?
- Are proper nouns capitalized?
- Are there words we can remove to make it more concise?
Addressing these types of questions is important in all types of writing—including email writing.
When planning letter-writing units, target the email genre as this is a lifelong technical-writing skills.
 Subscribe to webPD video library and view over 300 professional learning videos!
Subscribe to webPD video library and view over 300 professional learning videos!


[writing]
Teach letter writing based on the sender’s purpose

[writing]
The tips were very helpful. I thank you. Keep up your good work helping people understand.