What is a mini-lesson?
Effective mini-lessons are 15 minutes long, follow a 4-step rhythm, and progress through the gradual-release model (i.e., I do, We do, You do). Whether you’re teaching comprehension strategies or writing skills, the same 4-step architecture is the gold standard for planning and delivering whole-class instruction.
Master the 4-step mini-lesson
Teachers plan and deliver effective mini-lessons by using a four-step structure grounded in the gradual-release model (I do, We do, You do). Each 15-minute mini-lesson introduces a single, focused skill, models how it works, and guides students through shared application before assigning further practice.
Step 1: Introduce the skill
Start an effective mini-lesson by revealing, within the first 30 seconds of the lesson, what skill you plan to teach using the accurate academic vocabulary term (e.g., We are going to learn how to infer a character’s perspective.).
Lessons are mini, so keep the focus narrow. A mini-lesson addresses a small, granular facet of a complex, grade-level skill.
For example, you wouldn’t tackle teaching how to summarize informational text in a single lesson. Every 15-minute mini-lesson targets a small facet that feeds the grade-level skill.
- Consequently, first teach how to identify the most important details—versus those less important.
- Then, in a second mini-lesson, teach how to summarize an individual section of text into a single sentence.
- A third lesson in the series might reveal how to stack each section’s sentence to generate an objective summary of the whole text.
Similarly, in writing, you would never deliver one 15-minute lesson on how to write an introductory paragraph.
- First teach students how to write a single sentence that reveals the main purpose or thesis.
- Then, in a second mini-lesson, explain that the thesis needs to be preceded with a sentence or two that provides the reader some background on the subject.
- A third mini-lesson may show how to follow a thesis statement by listing the key points explained in the body paragraphs.
When a lesson is narrowly focused, it won’t take more than 30 seconds to introduce it.
Step 2: Instruct & demonstrate the skill
The longest and most important part of a mini-lesson is Step 2. This segment has two parts. In the first half (Step 2A), spend the next five minutes defining the skill and describing how it works.
- This skill means…
- It’s an important skill because…
- Readers/Writers use this when…
- Authors expect readers to…
- Authors give clues or details like…
- Readers/Writers think about…
While specifically and explicitly explaining how the skill works, capture this information onto an anchor chart DURING the lesson. This will be valuable for students to reference during the You-do task AFTER the lesson.
Although each lesson lasts 15 minutes, you will only deliver about 5 minutes of new content each day. That’s because after telling the students about the skill in Step 2A, then you (the teacher) model how it works in Step 2B.
While demonstrating the skill live in front of the students for 5 minutes during Step 2B, describe your thinking process along the way. Talk through how you wrestle with and ultimately apply the skill.
It is crucial that you plan out this portion of the mini-lesson. If you attempt to wing it, the mini-lesson will likely go long and/or you will start asking questions of the class. When this happens, the I do bleeds over into Step 3 (i.e., We do) prematurely. Step 2 is all about teaching the thinking.
The students have a role during this teacher-only model—to simply watch and listen. However, while pausing, hesitating, and troubleshooting in a Think Aloud, often students want to help you.


For those who raise their hands during the I do, ignore them. Don’t call on them. Tell them to put their hands down. This model isn’t necessarily for the 2-3 students who can help you but for the other 25 students who don’t know how to do the skill at all.
Although students are to merely watch and listen during Step 2B, we do want their help in Step 3.
Step 3: Interact with the skill
The next five minutes of the mini-lesson includes you, the teacher, applying the same skill in a second sentence, example, or excerpt and prompting students to participate by sharing their thinking.
Make sure to point out all of the key points you demonstrated in Step 2B—but this time, pause before giving “the answer.” Invite students to Turn and Talk—and then eavesdrop on their responses.
Anticipate that their first attempts may be weak and/or wrong. Consequently, share out what you heard, massaging their ideas to create a strong example.
Treat the We do with the same attention that you gave the I do. In other words—plan it out. Anticipate that you will do most of the work because they are still in the early learning stages of the skill. This We-do segment of a mini-lesson is more precisely characterized as I do again; you help me.
[NOTE: The We do is executed by all students orally. The You do will occur after the lesson and is typically done on paper.]
After the I do (Step 2B) and the We do (Step 3), it’s time to announce the You do (Step 4).
Step 4: Close & transition the skill
Close the mini-lesson and transition to independent work in Step 4. This takes only about 30 seconds and includes two components. First, restate the lesson’s focus and then describe the You-do task. What do you want students to do with the skill now that the lesson is over?
Notice the parentheses around the You-do label in Step 4. Although the I do and We do are executed within the 15-minute lesson, the You-do task is accomplished outside the lesson.
When planning what you want students to do, consider that they can’t necessarily execute this new and complex skill independently just yet. Therefore, don’t immediately make this an all-by-yourself assignment.
Instead, provide several You-do opportunities for students to work through the skill in small groups or pairs—and always in class—where you are nearby to provide lots of support. After the skill is refined and practiced with teacher guidance, then it becomes an independent You do.
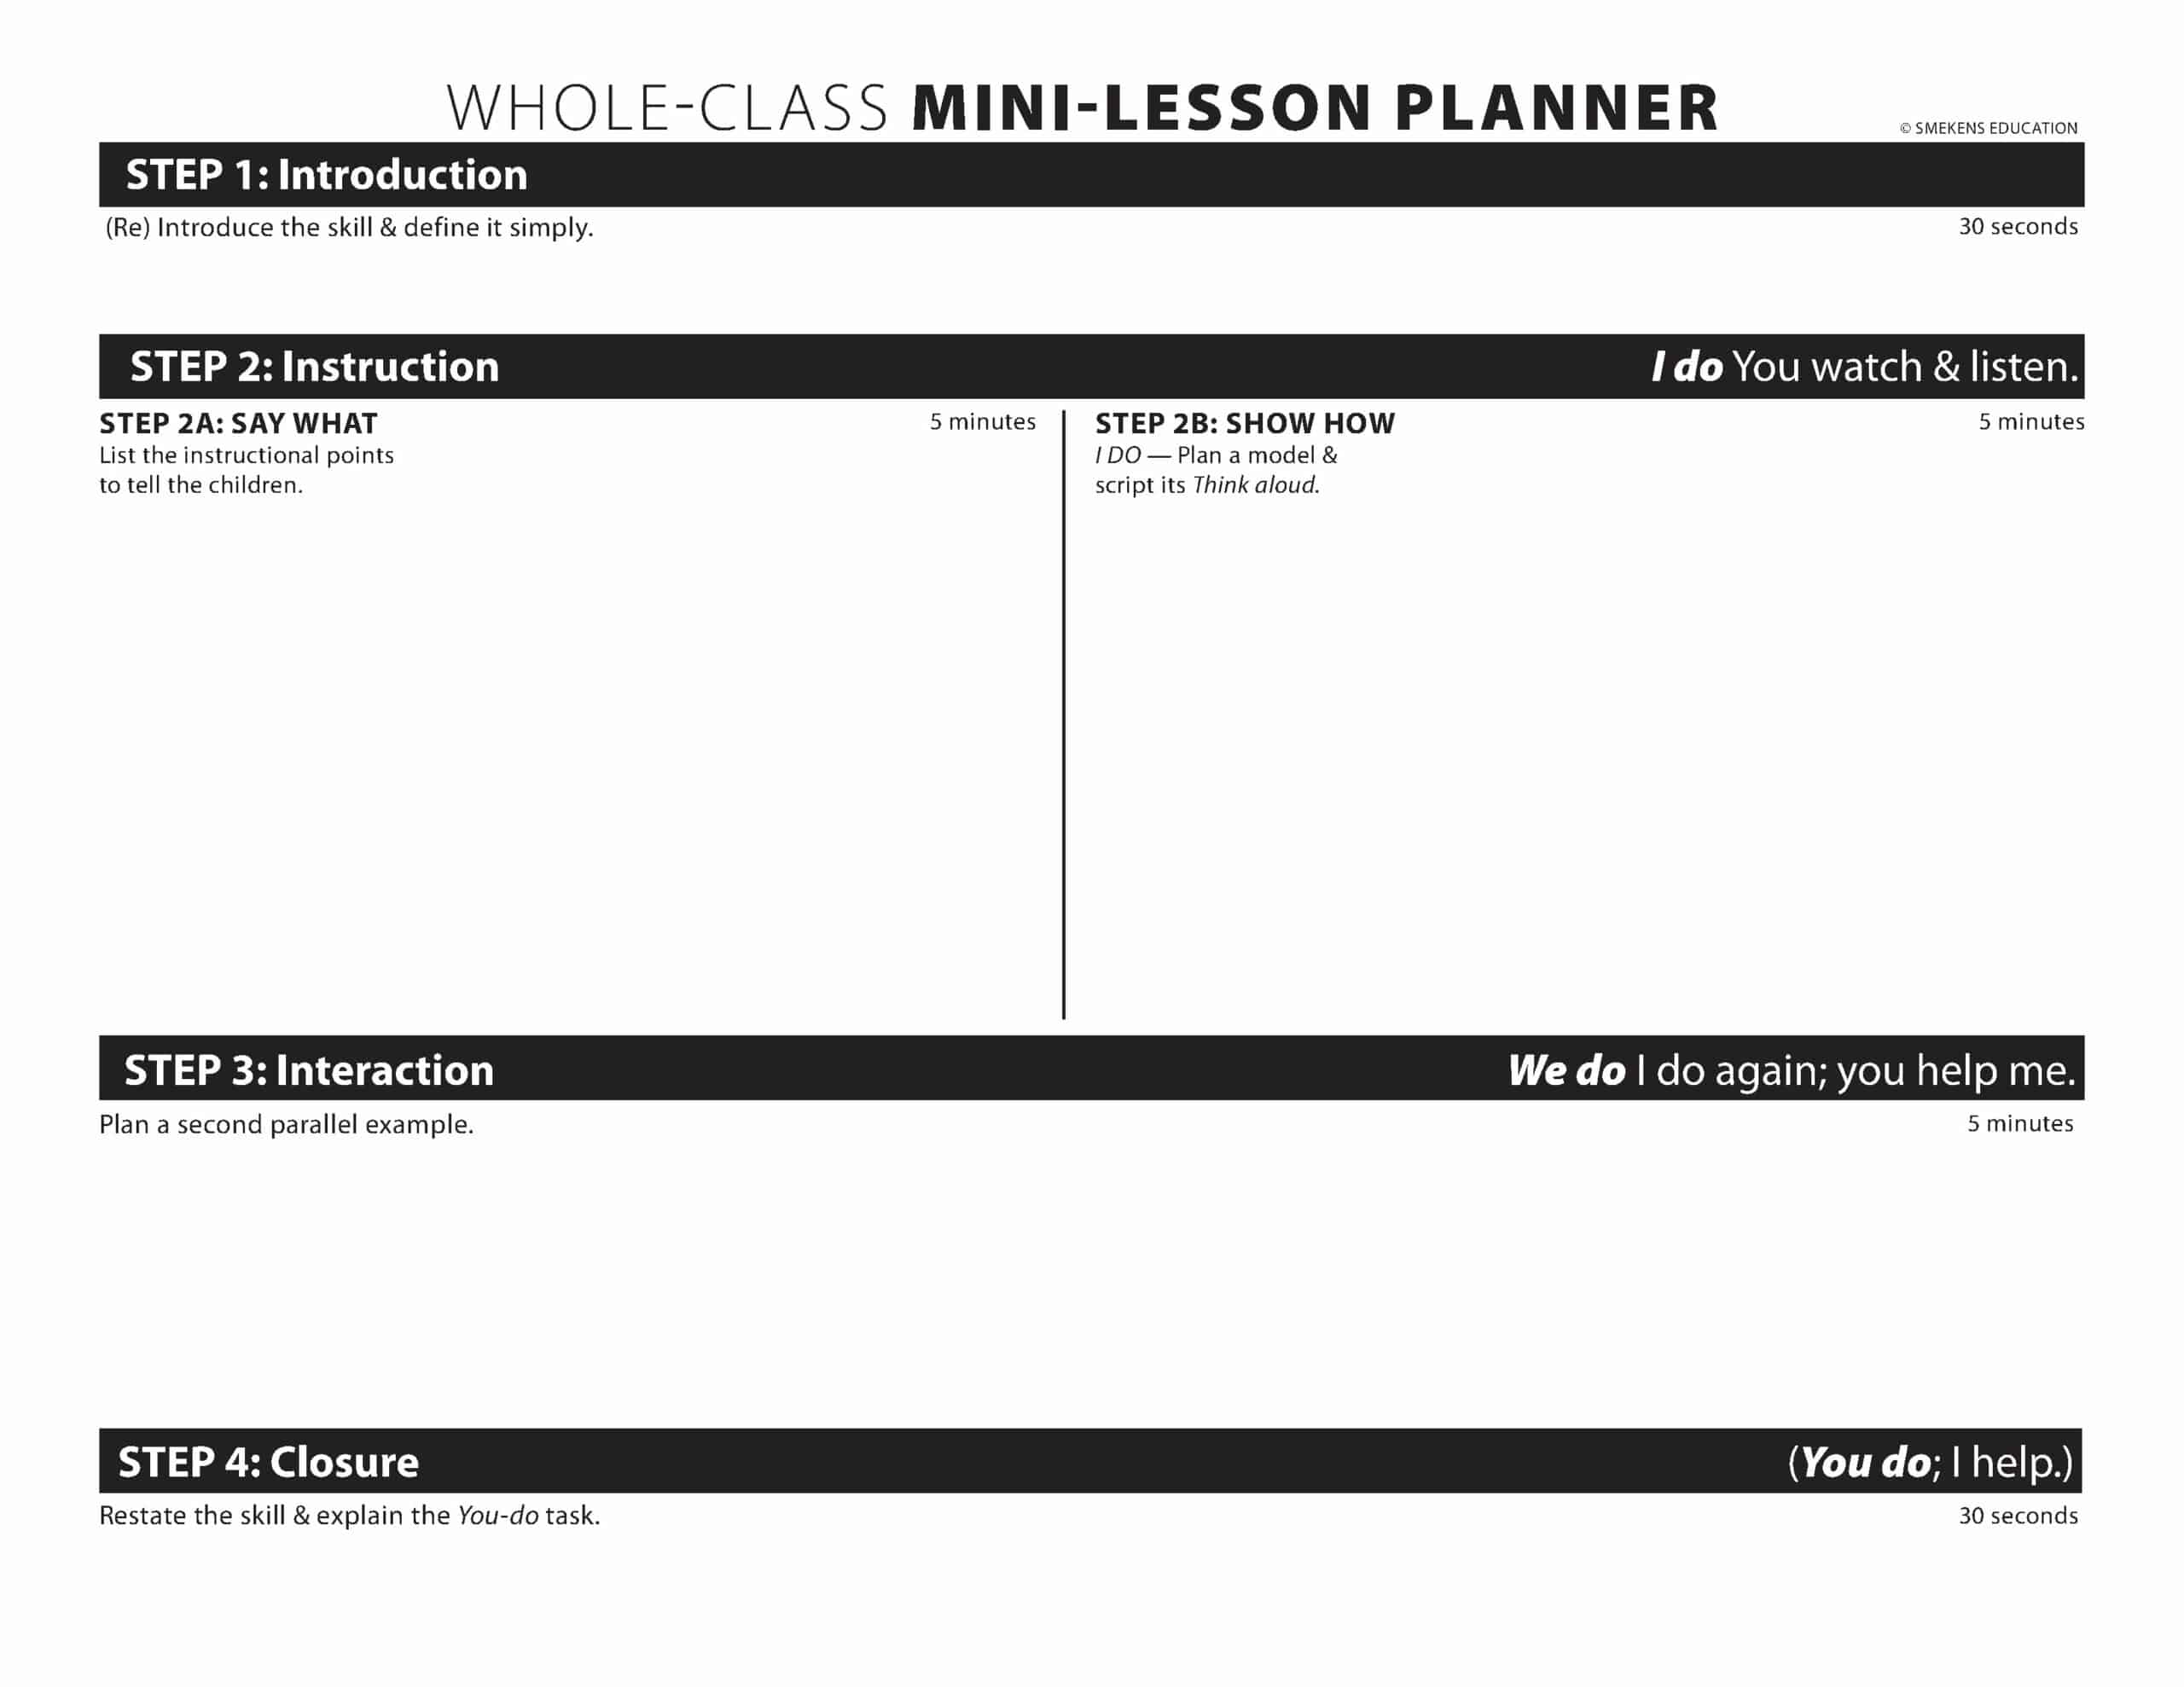 If you are ready to plan your whole-class mini-lessons utilizing these four steps, access the four-step mini-lesson planner available as a PDF or a Google Slide.
How do you plan a series of mini-lessons on the same skill?
Plan a series of mini-lessons on the same skill by outlining how that learning will build across several days. Each day, the same 4-step architecture is followed—with the same emphasis on gradual release (i.e., I do, We do, You do).
Throughout a multi-day mini-lesson series, you will shape and layer students’ knowledge about the skill in Step 2A and demonstrate that little bit more in Step 2B (i.e., I do) and Step 3 (i.e., We do). Therefore, each day the students become more confident with the skill and will be ready for more independent You-do assignments and eventually assessments.
FAQs
How do I choose the right skill for a mini-lesson?
Instruction should be rooted in the standards. Identify the skills within each standard and build mini-units around them. Mini-lessons grow out of those mini-unit skills. Spiral the skills across the year so students revisit them with increasing depth, and use student work to determine which ones need additional attention.
What types of texts work best for mini-lessons?
Use short excerpts from previously-read texts so the mini-lesson stays focused on the skill rather than on navigating new reading. This can include picture books, brief excerpts, mentor sentences, or a single paragraph from a shared class text—any familiar selection that clearly illustrates the skill being taught.
How do I differentiate within a whole-class mini-lesson?
Differentiation happens outside the 15 minutes. Keep the whole-class instruction consistent, then use the You-do time to provide flexible grouping, targeted conferences, additional modeling, or scaffolded tasks so students can work at the level of support they need.
Can the same four-step format be used for both reading and writing?
Four-step mini-lessons can be effective in any content area. The key is providing explicit instruction, modeling the skill, and practicing the target skill, whether it’s reading comprehension, writing or another content area.
How can I plan a series of mini-lessons on the same skill?
Plan lessons that build on each other. Start with a simple element of the skill, using a familiar text, then layer complexity each day so students gradually gain independence and confidence (Notice and name it, try it, apply it).
Subscribe to webPD video library and view over 300 professional learning videos, including a category for classroom mini-lessons!
Subscribe to webPD video library and view over 300 professional learning videos, including a category for classroom mini-lessons!


Organize your mini-lessons

Go beyond a model; reveal a Think Aloud

Awesome!
Awesome!
Very helpful! Thank you.