
Learning Center
writing
Customize a PK-2 writing rubric
december 12, 2023
 Primary students often approach their teachers during writing time with questions like “Is this good?” or “Am I done?” Rather than answering these questions, empower students to self-assess their work using a kid-friendly writing rubric.
When students help create the rubric, they naturally understand and embrace its criteria. This collaborative approach also ensures that the rubric is customized to each unique class and its individual writing abilities. As a result, no two first-grade rubrics will look the same; some classes have stronger writers and some have lower ones.
NOTE: This article is about instructional rubrics that grow with writers. This is not about collecting data from district-wide common writing prompts.
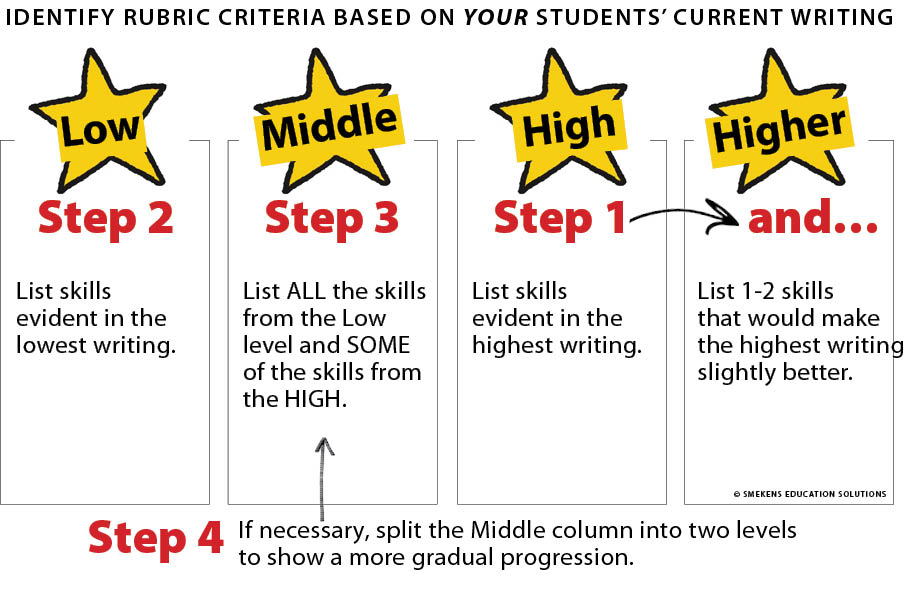
To create an instructional rubric fit for your students to utilize, first identify the range of writing skills that you are targeting. Select a couple of high, middle, and low writings from your writers. These should be writings that students generated all by themselves—NOT ones that were created with peers, dictated by the teacher, or copied from the board.
Then, by yourself, follow the next 5 steps to determine the rubric criteria. You will need to determine this detailed description of how the levels differ from one another BEFORE introducing a rubric to students.
Determine the rubric criteria
STEP 1: Describe the characteristics of the High level.
- Read through 2-3 writing samples that you collected from your HIGHEST students.
- Consider the picture details provided, the number of letters, words, or sentences written, the accuracy of the spacing, spelling & capitalization.
- Then list the common ingredients that these high examples include.
- Finally, consider 1-2 skills that are currently missing from these student writings. What skill(s) would make these writings slightly better? List these additional skills in the next column.
STEP 2: Describe the characteristics of the Low level.
- Read through 2-3 writing samples that you collected from your LOWEST writers.
- Analyze the quality of the picture, the number of letters or words, the correctness of the spacing & spelling, etc.
- Then list the writing skills demonstrated within these low examples.
STEP 3: Describe the characteristics of the Middle level.
- Read through 2-3 writing samples that you collected from your average writers.
- Again, list the ingredients that they have in common. (This will include ALL of the skills listed in the Low level and SOME of the skills listed in the High level.)
STEP 4 (Optional): Split the Middle column.
- Often there is a big difference in the expectations listed between the High and Low levels.
- Split the Middle column into two levels to show a more gradual progression.
STEP 5: Create anchor papers to illustrate the different levels.
- Young writers are young readers—so we need to visually depict each rubric level. This is where anchor papers or benchmark papers come into play.
- The anchor papers should ALL be on the same topic as they anchor each level with a visual example.
- Although you used student writing to determine the rubric criteria, you will NOT use ANY student writings as anchor papers on the final class writing rubric. (No one wants to be the author of the lowest level.)
- Consequently, in Step 5 YOU will create a set of NEW writing samples that mirror the criteria you have listed for each level.
- As you choose the topic for your anchor papers, be sure to select one that your students can relate to, but not a topic they would be writing about at any point this year.

Introduce the rubric
Once the criteria is listed and the anchor papers are created, it’s time to introduce the writing rubric to the students. Begin the lesson by defining the word “rubric.” A rubric is a tool we can use to measure how good something is. This way, we can be sure we’re always writing our best!
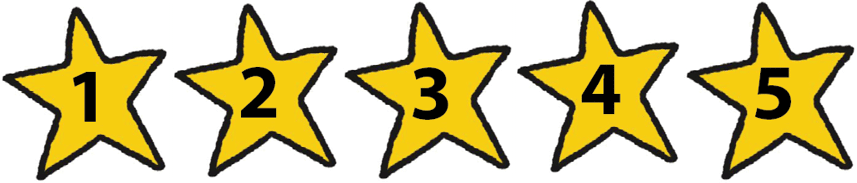 Introduce a set of numbered stars that represent the different levels on the rubric. Emphasize that all writers are at different levels, and everyone is working to get better and better. NOTE: The number of levels you created in Steps 1-4 (described above) will determine how many stars you need for this initial writing rubric.
Reveal the set of anchor papers that you made, referring to the writing skills you see in the different samples. This one has a lot of letter labels. This one has such a detailed picture. Look how many words this one has.
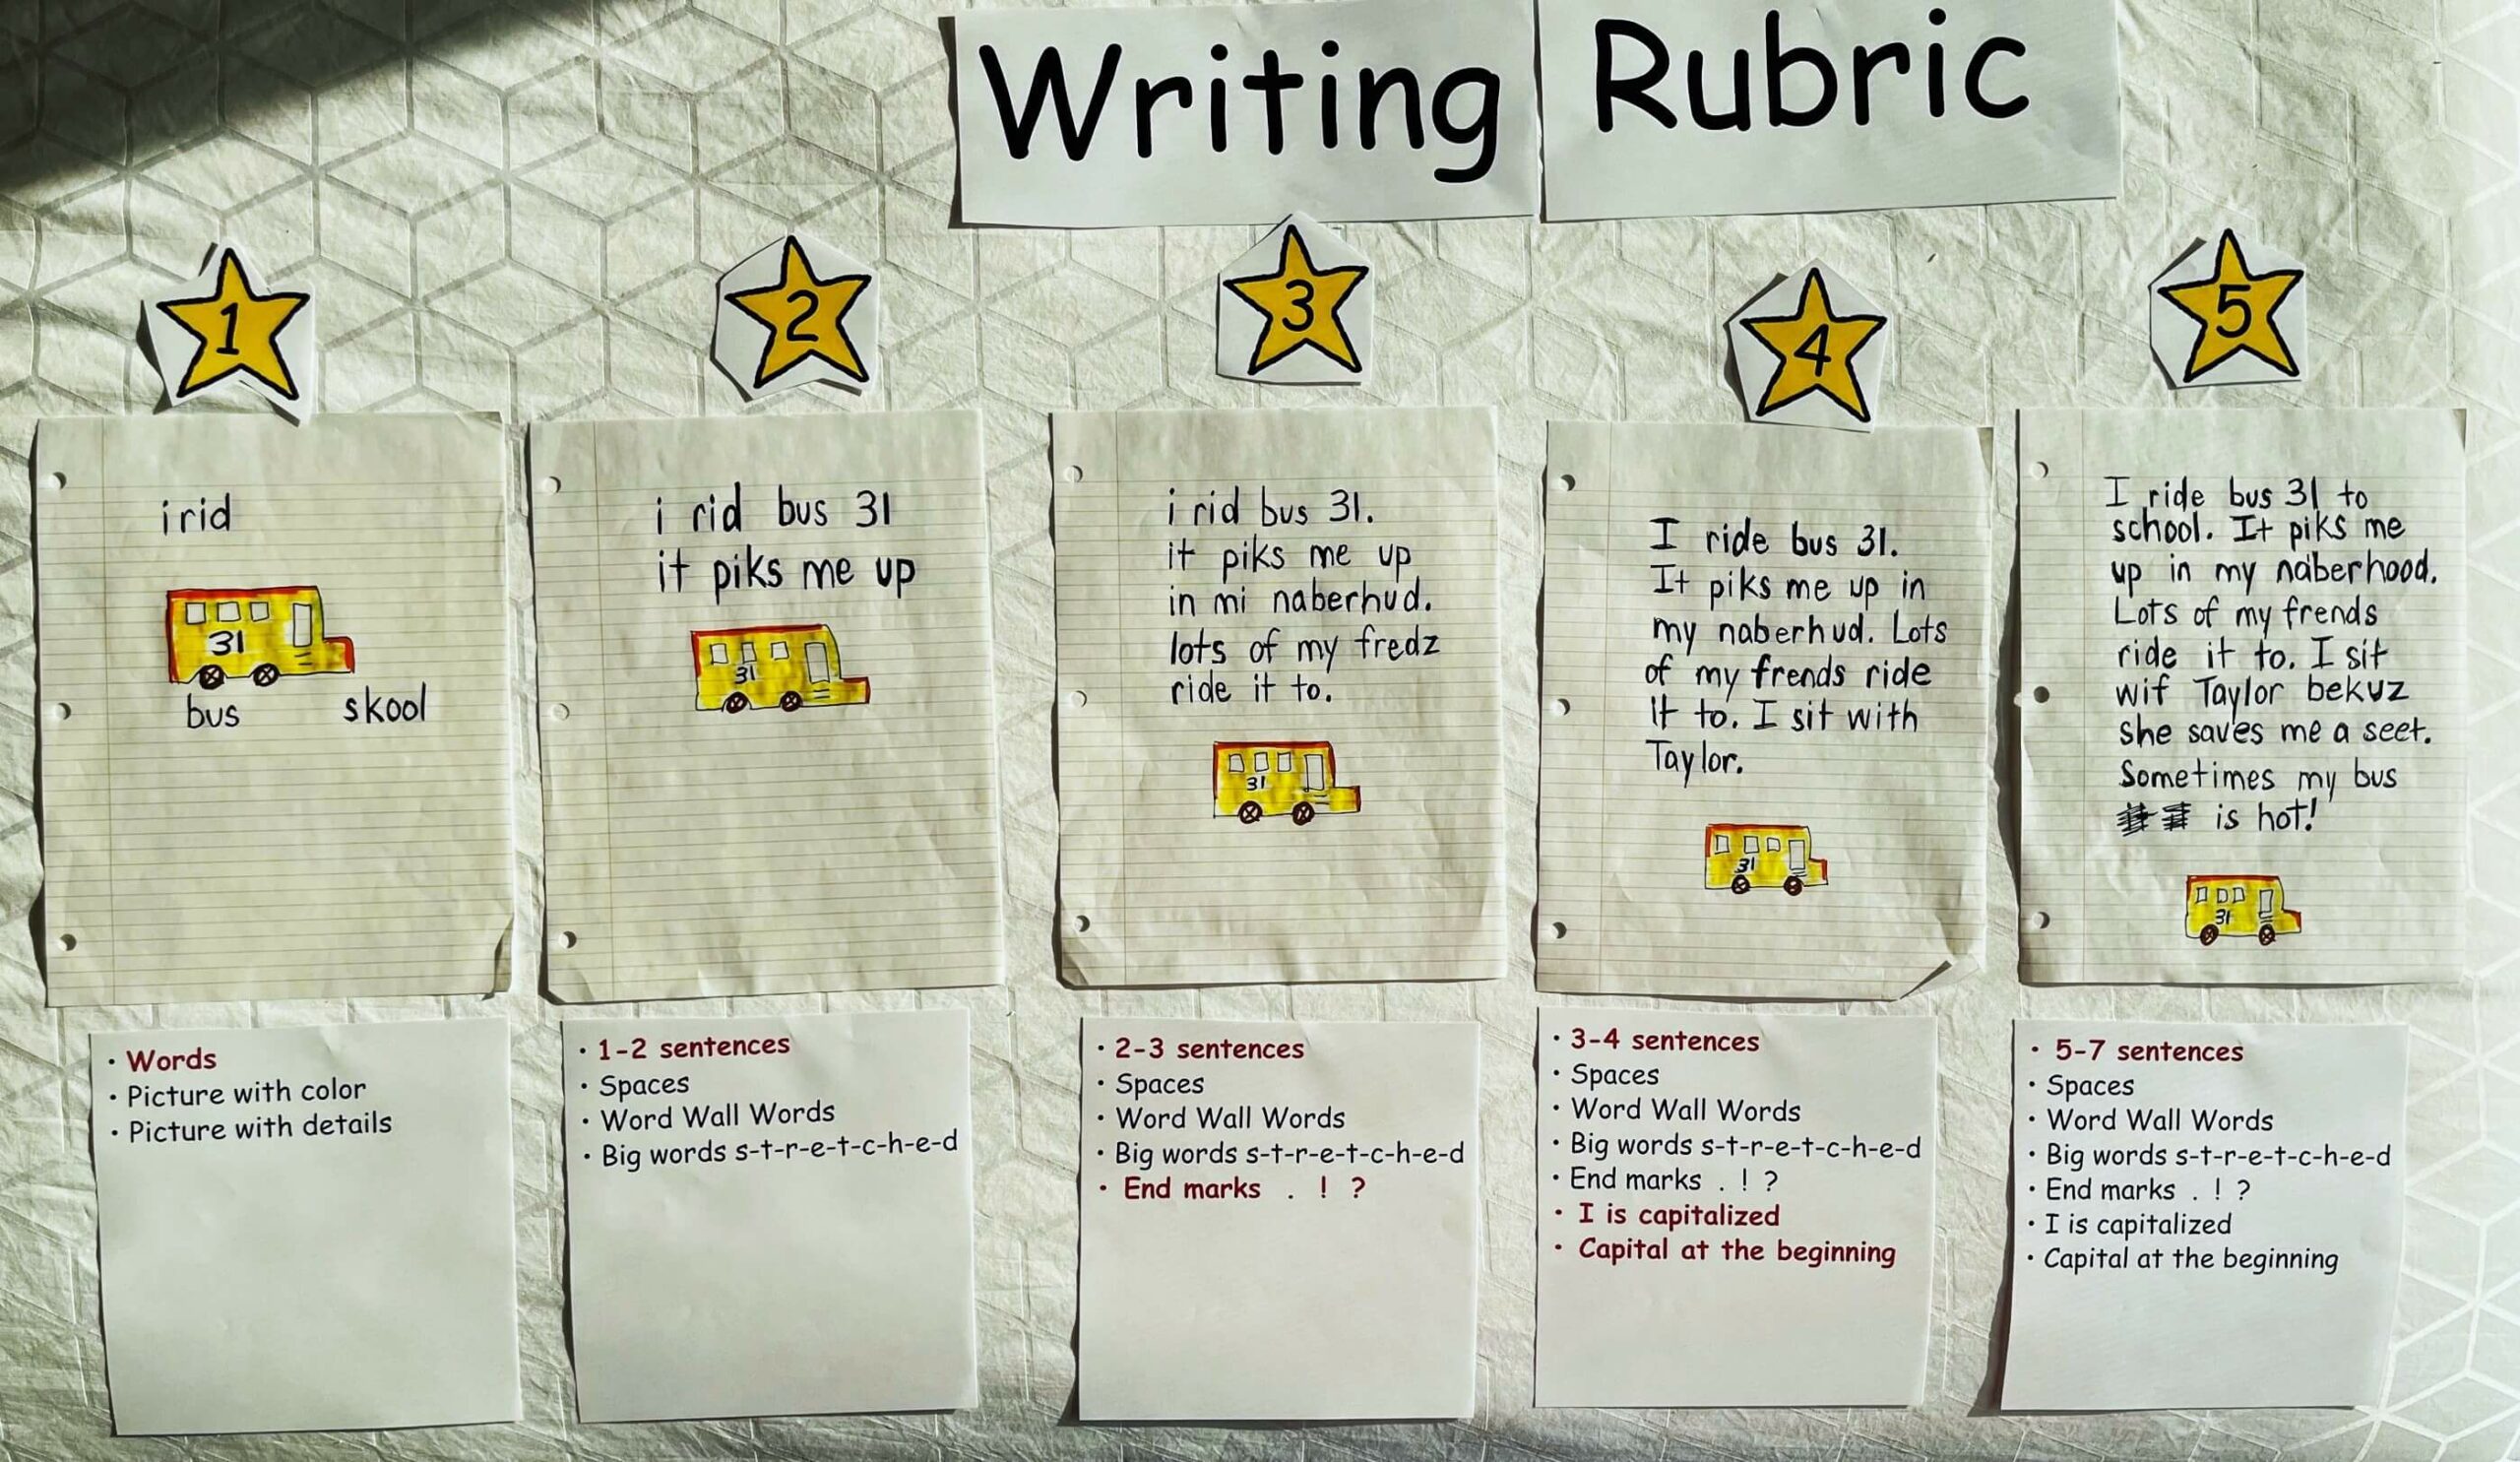 Sort the anchor papers from lowest to highest and post them under the corresponding stars. Starting with the Level 1, read aloud the specific criteria the 1-star anchor paper possesses while pointing out each of the skills evident within the anchor paper. Repeat this process with the remaining levels until all are posted.
Even when describing the lowest level, always talk about what the anchor paper has and what the writer did. (Keep this positive. Don’t mention what is missing or “bad” about the writing. Remember, these rubric levels are based on your students’ writing skills. We don’t want anyone thinking that he is a “bad” writer.)
Conclude the lesson encouraging students to use the class rubric during writing time to strive for the most stars!
Model using the rubric
 In a second mini-lesson, teach students explicitly how to use the rubric to make their writing even better.
Pull out a previous writing and walk up to the posted rubric. Model how you look at the different anchor papers posted on the rubric to determine which one LOOKS most like your writing. Focused on a single level, now model how to read the corresponding criteria like a checklist.
- Put your finger on the first skill in the criteria and read it out loud.
- Use a magnifying glass or eyeglasses to look for evidence of this skill within your own writing.
- Be methodical in this process, looking carefully and closely in different places on your paper.
- Look down at your writing and talk to yourself. Do I have this? Did I do this?
- Acknowledge how you executed some skills some of the time—but not every time.
- Each time you discover something is missing, pretend to go back to your seat to add or fix it.
Conclude the lesson by pointing at the criteria bulleted. Acknowledge that there are MANY skills that a writer has to remember. That’s why we need a rubric! A writer checks his writing skill by skill. This helps him assess what his writing may be missing and how to make it even better.
Grow the rubric
The rubric described above is only relevant for right now. It represents the current writing levels and goals for students. However, it will grow throughout the year. As new skills are taught, they will be added to the instructional rubric. This ensures that students are aware of the elevating expectations.


During the mini-lesson, reveal the new anchor paper and discuss its improved skills. Explain that these new skills have been taught but weren’t yet represented on any level of the class rubric.
Such a mini-lesson will occur approximately once a month, when strong writers consistently achieve the highest level or when concluding a mini-unit.
Understand that all students will NOT be at the top level of the rubric when it’s time to update it. Make sure students know that this is okay. The goal is steady growth and improvement—just moving to the next level and the next. This is also the rationale behind only adding levels—and never removing any. This honors each student’s journey.
Plan for ample wall space to accommodate the growing rubric. Since new levels may be added monthly, the rubric could reach 12 levels by year’s end. This permanent resource shouldn’t be treated like a temporary anchor chart.
Consider both width and height when positioning the rubric. Ensure it’s low enough for “littles” to easily reach and touch the bulleted criteria, allowing them to check their writing for evidence as needed.


[writing]
Build kid-friendly writing rubrics
[writing]
Use a 6-Traits rubric for efficient assessment
[writing]